11 Rapid Troubleshooting Tips for the Aerial Drone Competition
11 Rapid Troubleshooting Tips for the Aerial Drone Competition
TL;DR
Here are 11 troubleshooting tips to check for during competitions:
- Check that propellers are in the correct position
- Make sure to use a data transfer USB cable
- Make sure your controller is in the LINK state when coding
- Be sure your drone and controller are paired
- Make sure you know what speed you're in
- Keep the antenna extended and pointed at your drone
- Trim your drone to avoid drift
- Check that batteries are charged
- Make sure your propellers don't have any debris in them
- Recover from the "Controller Update" issue
- Make sure you are on the latest firmware
Even with all the prep in the world, sometimes you'll run into situations where your drone isn't performing the way you expect. Maybe it's not taking off, maybe it's flying unexpectedly, or maybe your drone isn't pairing to Blockly. Part of being a strong competitor is knowing how to troubleshoot issues quickly in the moment, so that you can get your head back in the game.
So here are 11 rapid troubleshooting checks for contestants in the Aerial Drone Competition to look out for.
1. Check that propellers are in the correct position
If you've ever replaced your propellers, you may have noticed that not all of the propellers are the same. Some turn clockwise (CW), some turn counter-clockwise (CCW). In order for a drone to fly, the propellers need to rotate in the correct direction. You may also notice that there are letters on the underside of the propellers: F and R. Here's the rule of thumb:

The propellers should always turn towards the middle along the outer edge of the drone. A nice pneumonic device you can use to think about the F and R labels is:
- F to fast forward (clockwise)
- R to rewind (counter-clockwise)
Here's a picture of the propeller lettering, so you know where to find them:

2. Make sure to use a data transfer USB cable
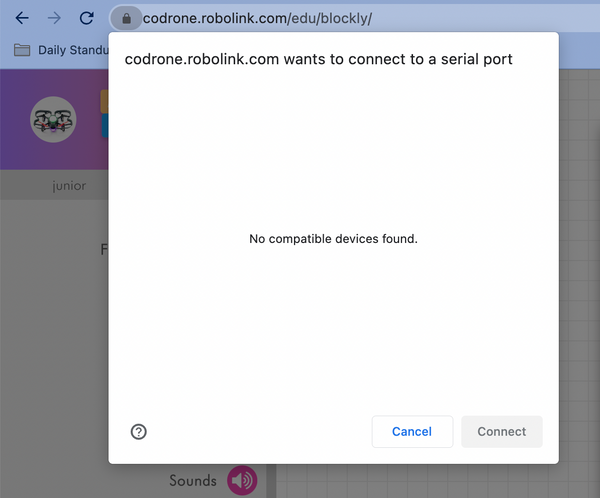
Sometimes what may happen is you get into Blockly, you hit "Pair," and then nothing comes up in the list.

Usually this is because you're using a micro USB cable that's charge-only. Some USB cables are not able to do data transfer, so you can only use them to charge. Our recommendation: use the micro USB cable that comes with the box. If you don't have it, make sure to check that the controller shows up in the list when you plug it into the computer.
3. Make sure your controller is in the LINK state when coding
If you've got a bunch of commands in Blockly, but when you hit "Run", the CoDrone EDU takes off, but won't do anything else, you're likely not in the LINK state on the controller. The LINK state is used for connecting the controller to a computer, so you can code the CoDrone EDU. Your Blockly (or Python) code is giving commands to the drone by using the controller to broadcast signals to it, but in order to do this, you'll need to be in the LINK state.
With the controller plugged in, press the Power button on the controller until you see "LINK" on the screen, like this.

4. Be sure your drone and controller are paired
You're holding L1, but the drone just isn't taking off. You see the controller and the drone lights are both on, but none of the buttons seem to make the drone do anything. Most likely, your drone and controller haven't been paired yet. This often happens when you're swapping controllers or drones, because maybe a teammate's drone hasn't had as many crashes, so it's flying more stably.
The quickest way to know if your drone and controller are paired is to check that R1 is changing the drone and controller LED colors. If it's not, and you're noticing that the drone and controller LEDs are blinking, you need to pair them together.
Pair by pressing and holding the button on the bottom of the drone until it flashes yellow. Then press and hold the P button on the controller, until you hear a chime. Now you're paired! Press R1 a few times to confirm you're able to change the LED colors.
If you're at the event, and you're having issues with this, someone else nearby might be trying to pair as well. So check for that, or if you can, step outside of the gym or into a hallway briefly to make sure the pairing process is successful before heading back into the event.
We also have a full video on how to pair your drone and controller on Basecamp.
5. Make sure you know what speed you're in
You're noticing that the drone isn't flying as fast as it was before, but you're not sure why. If you look at the controller screen, you'll see an S1, S2, or S3 in the top left corner of the screen.

The letter shows what speed you're in. S1 flies at 30% speed, S2 flies at 70% speed, and S3 flies at 100% speed. This can be changed by pressing L1. Oftentimes, you might have accidentally changed the speed of your drone if you were pressing L1 to take off or land, but you let go of the button too quickly.
6. Keep your antenna extended and pointed at your drone
If you've noticed the controller and drone randomly flashing at the same time in the middle of flight, that's a temporary signal drop. During those (hopefully) brief seconds, the drone won't seem to respond to your controls.
We've worked very hard to try and make signal stability strong for the CoDrone EDU, since it is mainly used in classroom and crowded settings. That being said, there are still limitations to keeping the signal stable, especially when you've got a lot of devices and people around, which is often the case at competitions.
Our recommendation is to always pull out the antenna when flying the drone, whether piloting or coding. Point it directly at the direction of the drone, so it misses as few commands as possible.
7. Trim your drone to avoid drift
This is a common issue if you've been using the drone a lot, especially if you've crashed the drone a lot. The CoDrone EDU can take a decent number of crashes, but it will inevitably start to drift after many crashes.
Trimming the drone using the directional buttons on the controller can help to account for drift. You can check out our video on trimming on Basecamp.
If your drone is still drifting a lot, even after significant trimming, it might be time to replace the motors. Generally, the motors in the direction that the drone is drifting are usually the ones that need replacement, because they may be spinning more slowly compared to the other motors.
You can also check our video on replacing motors on Basecamp.
8. Check that your batteries are charged
Oftentimes, the drone's behavior will be less stable when the battery is drained. Specifically, signal stability is less reliable, movements may be less precise because the motors can't get as much power, and commands might not be as smooth or crisp as you'd expect. This is often because the battery is low.
We recommend for best performance, do a run in the competition on as full of a battery as you can. Better yet, it's good to always have a stash of fully charged batteries ready when you're in a competition setting.
9. Make sure your propellers don't have any debris in them
Hair! That's the most common thing to get caught in the propellers. Make sure that if you're noticing any flight issues, before trimming and before cracking your CoDrone EDU open to replace a motor, just check that there isn't debris caught under the propellers. Usually a strand of hair or a piece of thread from clothing will get wrapped under the propeller.
The best way to remove it is to just pull off the propeller to remove the hair.
10. Recover from the "Controller Update" issue
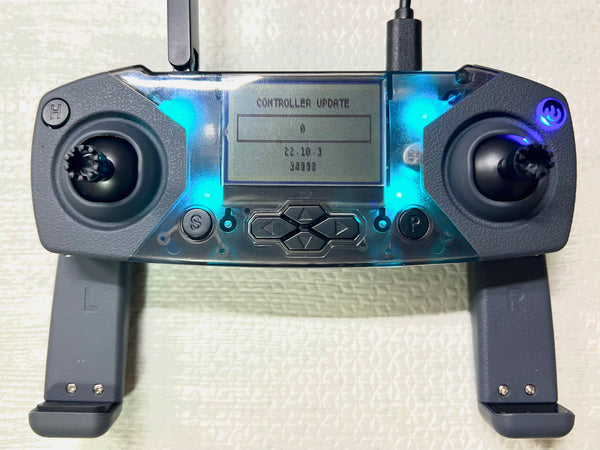
There's a known issue that's resolved with the latest firmware, where the controller will randomly get into a state where the screen on the controller says "Controller Update" with a number that keeps counting up, and there's a loading bar that stays at 0. This is a bug that seems like the controller is updating its firmware, but it actually isn't—the controller has no way of connecting to WiFi. It's a bug that we've fixed with the latest firmware. The screen ends up looking like this:

When the controller does get into this state, it also loses its pairing with your CoDrone EDU. You'll just need to restart your controller by powering it off, and powering it back on. Then you'll need to re-pair with your drone again.
Important: To avoid the issue altogether, make sure to update to the latest firmware for both the controller and the drone. Check out our Robolink Help article on how to update to the latest firmware. Speaking of which...
11. Make sure you are on the latest firmware
As we've found bugs and gotten feedback, we've continued to fix issues and make improvements to the firmware, which is the software that's installed on your controller and your drone. Make sure that you are on the latest firmware, so you don't encounter some of the issues that were already fixed from older versions of the firmware.
To update your firmware, you'll need to have access to a Windows laptop or desktop that has a USB port. At the moment, firmware updates are only possible from a Windows machine.
Follow these steps in our Robolink Help article to update to the latest firmware.
This is by no means an exhaustive list of the possible issues that may arise, but they are some of the most common. Of course, there are other issues that may arise, so it's important to practice and be as prepared as possible for any issues that may arise.
For other CoDrone EDU related issues, we recommend checking out our Robolink Help page. For Aerial Drone Competition related questions, you can check out the Aerial Drone Competition page.
You should also head on over to our CoDrone EDU Basecamp page, where all of our lessons are for how to use and code the CoDrone EDU, so you can prepare for the Aerial Drone Competition.
Good luck out there, contestants!